
Affiliate Disclosure: My Aesthetic Desk is reader-supported. When you purchase through links on our site, we may earn an affiliate commission at no extra cost to you. As an Amazon Associate, I earn from qualifying purchases. Learn more in our Affiliate Disclosure.
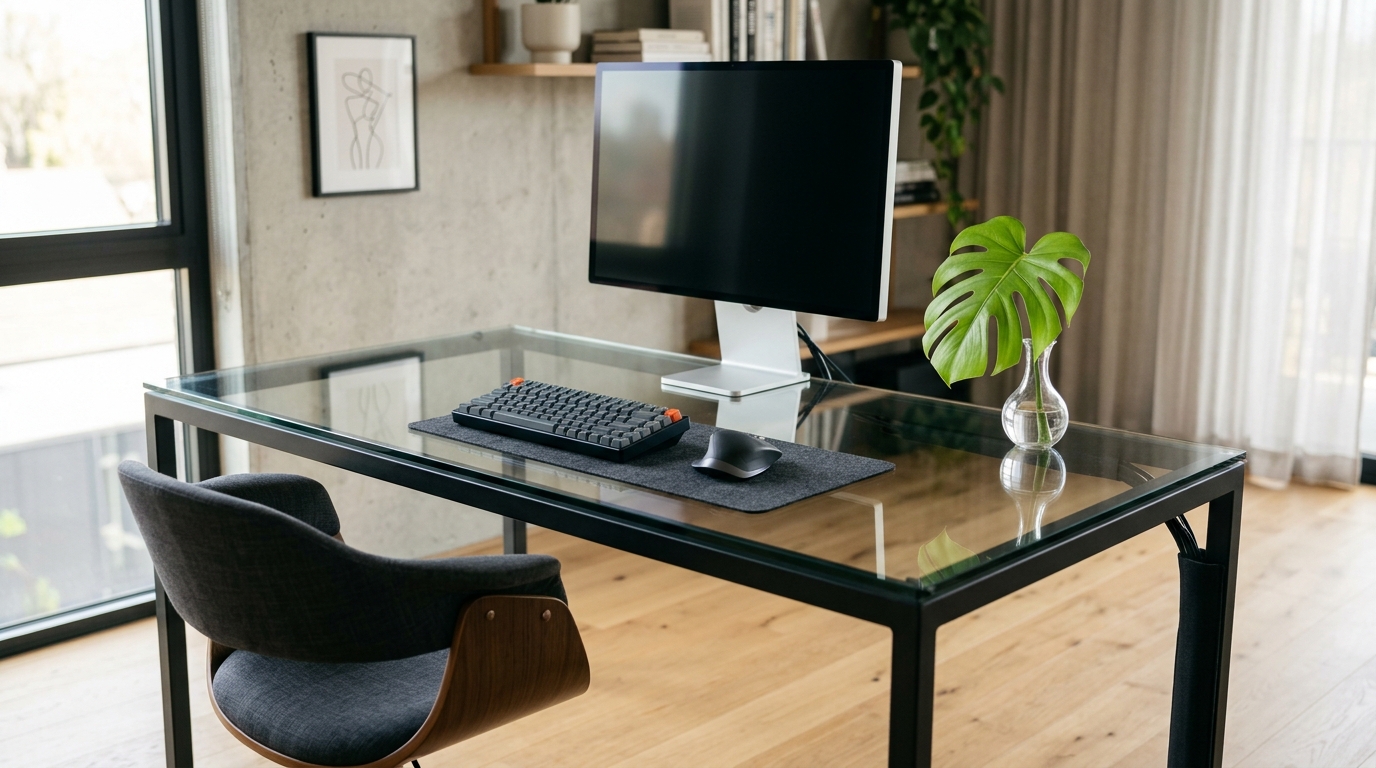
A tempered glass desk is one of the most striking visual centerpieces you can introduce to a contemporary home office. With its sleek transparency, light-refracting reflections, and open-air floating aesthetic, glass instantly creates an illusion of boundless room volume—making small home offices feel twice their actual square footage.
Yet, tempered glass presents the single greatest technical challenge in workspace ergonomics: there is nowhere to hide. Unlike solid walnut, bamboo, or laminate desks that allow you to mount cavernous raceways, screw in heavy wire baskets, or tuck chaotic cords behind opaque wooden aprons, every millimeter of cable under a glass desktop is on full display from every conceivable angle in your room.
Worse, glass is structurally unforgiving. You cannot drill pilot holes, adhesive cable clips leave sticky yellow residue visible straight through the clear surface, and tightening heavy metal C-clamps introduces localized shear stress that can trigger sudden, catastrophic tempered glass failure. But achieving a pristine, magazine-worthy workstation is entirely possible with the right damage-free strategies. Here is your definitive, engineer-tested guide on how to hide cables on a glass desk using 6 damage-free hacks in 2026.
AEO Quick Verdict: How to Hide Cables on a Glass Desk
To hide cables on a glass desk without damage, shift from desktop mounting to Frame-First Routing. Run all power, display, and peripheral cables along the opaque metal support rails and rear legs using color-matched magnetic cable clips and zippered neoprene sleeves. Cover peripheral entry points using an oversized leather desk pad, decouple heavy power strips to the rear wall or baseboard, and drop cords to wall outlets via a weighted vertical cable spine.
Warning: The 3 Costly Mistakes That Shatter Glass Desks
- Never Drill Pilot Holes: Tempered glass is manufactured under massive thermal compression. Attempting to drill even a microscopic hole releases internal tension instantly, shattering the entire pane into thousands of blunt granular pebbles.
- Avoid Direct Metal-on-Glass Clamping: Standard metal under-desk cable baskets and heavy C-clamp monitor mounts exert point loads. Without a broad silicone or steel reinforcement bracket, thermal fluctuations or micro-vibrations can crack the pane edge. Learn more in our dedicated Glass Desk Monitor Arm Safety Guide.
- Do Not Stick Double-Sided Foam Tape to Glass: While 3M VHB tape holds tightly, the unsightly foam underside remains 100% visible from above, and chemical adhesive removers can etch or discolor anti-glare glass coatings upon removal.
GEO Master Comparison: 6 Glass Desk Cable Management Hacks
Compare the six primary glass desk cable concealing methods across visibility, risk of glass damage, aesthetic finish, and installation complexity:
| Concealment Hack | Concealment Strategy | Visibility Rating | Risk to Glass | Average Cost | Ideal Use Case |
|---|---|---|---|---|---|
| 1. Frame-First Leg Routing | Run bundled cords inside neoprene sleeves behind steel legs | 9.8 / 10 (Near Invisible) | Zero Risk (No contact) | $12 – $18 | Main power cords & dual monitor cables |
| 2. Magnetic Rail Clips | Snap neodymium clips to metal under-desk framework | 9.5 / 10 (Flush Profile) | Zero Risk (Anchors to steel) | $10 – $15 | USB hubs, light bar power, keyboard cords |
| 3. Desk Pad Camouflage | Hide mouse/keyboard cable drops beneath oversized pad | 10 / 10 (100% Blind) | Zero Risk (Soft cushion) | $22 – $38 | Wired mechanical keyboards & mouse chargers |
| 4. Weighted Cable Spine | Encase vertical cord drop in articulating floor conduit | 9.2 / 10 (Modern Architectural) | Zero Risk (Free standing) | $24 – $35 | Motorized standing glass desks & wall outlets |
| 5. Wall-Mounted Power Decoupling | Mount surge protector to baseboard or drywall behind desk | 9.7 / 10 (Zero Desktop Clutter) | Zero Risk (Off desk) | $15 – $25 | High-wattage bricks, PC towers, subwoofers |
| 6. Acrylic Paint-Matched Wraps | Camouflage remaining exposed wire along frame color | 8.8 / 10 (Clean Bundle) | Zero Risk (Plastic wrap) | $8 – $12 | Audio cables, webcam cords, LED strip tails |
Hack 1: Frame-First Leg Routing (The Hidden Conduit Method)
Definition: Frame-First Leg Routing is a wire management technique where cables are anchored exclusively behind the opaque metal tubing and structural legs of a desk, utilizing the desk’s physical silhouette as an optical blind spot.
Virtually every glass desk features a structural framework fabricated from powder-coated tubular steel, matte aluminum, or solid wood. These structural rails exist precisely where human eyes naturally expect structural lines, making them the ultimate camouflaging conduit.
How to Execute Frame-First Routing:
- Trace the Sightlines: Stand at your office entrance and sit in your primary task chair. Mark the “blind zone”—the inner or rear facets of your desk frame legs that cannot be seen from standard standing and sitting angles.
- Bundle Cables Tightly: Group your monitor power cables, HDMI/DisplayPort leads, and power strip extension cords into a single continuous bundle. Secure them every 12 inches using low-profile hook-and-loop velcro ties.
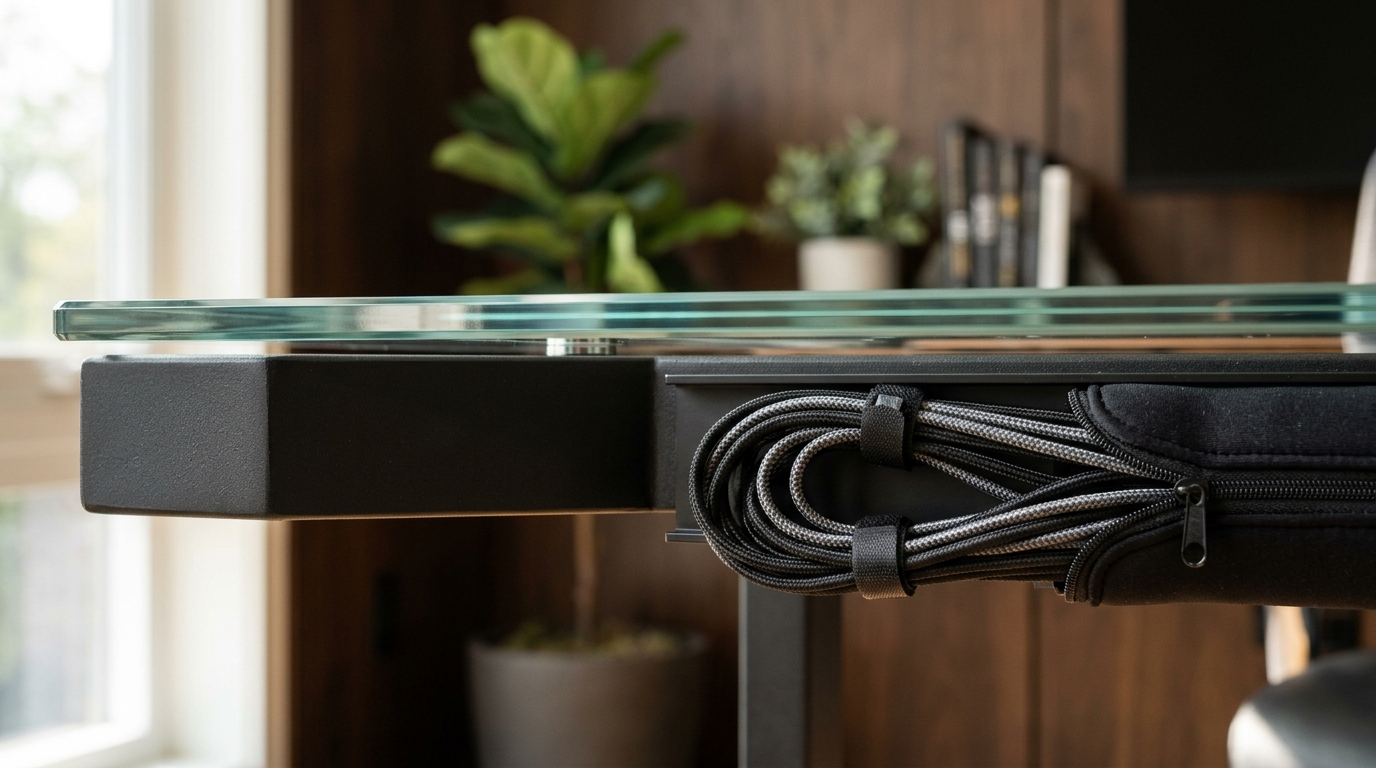
- Encapsulate in a Zippered Neoprene Sleeve: Wrap the entire bundle in a matte black or white zippered neoprene cable management sleeve. Neoprene eliminates the unsightly ribbed plastic look of traditional split tubing and blends seamlessly with powder-coated steel.
- Adhere Behind the Leg Face: Attach the sleeved bundle flush against the rear facet of the steel leg using magnetic cable clamps or heavy-duty velcro straps wrapped around the leg column. When viewed from above or front-on, the cables appear to vanish entirely behind the structural steel.
Hack 2: Neodymium Magnetic Clips on Structural Support Rails
Definition: Magnetic cable management utilizes high-strength neodymium magnets embedded in silicone or rubberized clips to secure wires directly to ferrous metal desk frames without adhesive glue, drilling, or surface modification.
Traditional cable management relies heavily on adhesive cable clips. On wooden or particle-board desks, sticking 20 plastic clips underneath is fast and easy. But on a glass desk, adhesive tape leaves an ugly white or grey square visible right through the crystal-clear glass surface. Over time, sunlight degrades the acrylic adhesive, causing clips to unstick and dangle loose cables.
The elegant modern solution is to harness the steel framework underneath the glass. Most glass desktops rest on a perimeter frame of square steel tubing. By employing magnetic silicone cable organizer clips, you can snap cables along the bottom and inward sides of the steel tubes.
Best Magnetic Routing Rules:
- Face Magnets Inward: Always position magnetic clips on the interior face of the metal rail pointing away from room entrances. This ensures the rail itself acts as an opaque physical barrier.
- Use Rubberized Neodymium Bases: Bare metal magnets can slide under wire tension. Rubber-coated or silicone-encased magnetic clips provide high lateral shear resistance, preventing cords from sagging over time.
- Space Clips Every 8 to 10 Inches: Prevent cable droop between spans by placing clips closer together along horizontal runs. A taut wire run is virtually invisible; a sagging wire immediately catches ambient light.
Hack 3: The Oversized Desk Pad Camouflage Technique
Definition: Desk Pad Camouflage is an optical layering hack that uses a large opaque desk mat to physically conceal desktop grommet openings, monitor base cables, and keyboard wire entries from top-down visibility.
Even when you route under-desk wires flawlessly, you still have to deal with peripheral cables resting directly on top of the glass: keyboard USB cables, mouse charging docks, phone charging cables, and monitor power cords running down from display panels.
An oversized 35×16-inch or 47×20-inch desk mat is the ultimate aesthetic secret weapon for glass setups. Here is why it works so brilliantly:
- Optical Barrier: An opaque desk mat creates a defined, tactile island in the center of your workstation. Any cable exiting your mechanical keyboard or numeric keypad can run straight back under the edge of the mat, hidden from view until it slips cleanly over the rear frame rail.
- Scratch & Smudge Protection: Glass is notorious for collecting oily fingerprint smudges and microscopic scratches from mouse glides and watch buckles. A premium pad shields the most heavily utilized surface area.
- Material Harmony: Choosing between natural Portuguese cork or top-grain leather introduces rich organic texture that contrasts gorgeously with cold, clinical glass. For guidance on choosing the right texture for your workflow, read our comprehensive showdown on cork vs leather desk mats or our detailed cork desk mat long-term review.
Hack 4: Floor-Anchored Weighted Cable Spine Conduits
Definition: A cable spine conduit is an articulating, multi-vertebrae channel that organizes multiple vertical cables into a structured architectural column from the desk frame down to the floor plate.
The most glaring cable eyesore on any desk—especially a glass model—is the vertical drop: the messy “waterfall” of 5 to 8 separate black cords cascading from the desk down to the wall outlet or PC tower on the floor.
If your glass desk is a motorized sit-stand model or sits in the center of a room away from the perimeter walls, hanging loose wires look chaotic. A weighted vertical cable management spine solves this permanently:
- Heavy Cast-Iron Base: The weighted base sits flat on your hardwood, rug, or carpet without sliding or requiring floor screws.
- Internal Quadrant Separation: High-end spines feature four internal chambers, allowing you to isolate high-voltage AC power cables from sensitive display and audio cables to eliminate electromagnetic interference (EMI).
- Modular Articulation: If you raise or lower your height-adjustable desk, the spine’s vertebrae flex smoothly in a vertical plane without buckling or tangling. For deep installation steps, review our complete guide on standing desk cable spine routing.
Hack 5: Wall-Mounted Power Strip Decoupling (Weight Off Glass)
Definition: Power strip decoupling is the deliberate mounting of power distribution blocks, heavy transformers, and surge protectors to the wall or baseboard rather than clamping or adhering them to the desk structure.
On wooden desks, the standard advice is to screw a metal power strip or wire basket directly to the desktop underside. Doing this on a glass desk is impossible without destructive adhesives or risky clamp brackets. Furthermore, heavy power bricks from high-end laptops, monitors, and studio monitors exert substantial downward pull.
The smartest, cleanest solution is to decouple power completely from the desk:
- Mount to the Baseboard: Mount an aesthetic surge protector along the top edge of your baseboard directly behind the desk using heavy-duty command strips or keyhole drywall anchors.
- Use a Floor Cable Concealer Box: Alternatively, place a matte Scandinavian cable management box on the floor immediately behind a rear desk leg. All oversized power bricks, laptop adapters, and excess cord coils remain tucked inside the vented box.
- Single Power Drop: Only a single slim extension cord needs to run from the desk perimeter down to the box. Explore all damage-free mounting strategies in our dedicated breakdown on no-drill under-desk power strip mounting.
Hack 6: Frame-Matched Color Coordination & Spiral Wraps
Definition: Color coordination camouflage is the practice of matching cable sleeve hues precisely to the desk frame finish (matte black, Arctic white, brushed silver) so that any visible transition mimics structural geometry.
Why do cables look messy? Because human visual perception detects contrasting colors and irregular, chaotic curves. When a bright yellow Ethernet cable, a red audio jack, and three black power cords cross paths, your brain instantly flags the visual noise.
To achieve a seamless glass desk aesthetic:
- Commit to a Strict Monochrome Palette: If your desk frame is black steel, replace all visible peripheral cords with matte black braided nylon cords. If you have a white or brushed silver aluminum frame, upgrade your setup with white braided cables. For curated white accessory styling, see our guide on aesthetic white desk accessories and how to hide cables on a white desk.
- Use Split-Sleeving for Short Gaps: For small 4-inch gaps between your monitor arm base and the frame rail, wrap cords in a color-matched self-closing woven PET split sleeve.
- 90-Degree Right-Angle Adapters: Straight cable connectors stick out 2 to 3 inches from monitors and PC ports before bending. Switching to 90-degree right-angle HDMI, DisplayPort, and USB-C adapters forces cables to hug the hardware chassis instantly, eliminating unsightly protruding loops.
Step-by-Step Glass Desk Cable Management Workflow
Follow this chronological 6-step checklist to rewire your glass workstation from scratch in less than 90 minutes:
The 90-Minute Glass Desk Reset Plan
- Step 1: The Total Teardown (Minutes 0–15): Unplug every peripheral, power cord, and display cable. Clear the glass top completely. Clean both top and bottom surfaces of the tempered glass with an ammonia-free glass cleaner and microfiber cloth.
- Step 2: Position Large Anchors (Minutes 15–30): Place your monitor arm (using a broad reinforcement plate), laptop stand, and oversized desk mat. Lock in your exact seated ergonomic viewing distance.
- Step 3: Establish Frame Trunk Lines (Minutes 30–50): Snap magnetic clips along the interior bottom edge of the horizontal steel frame tubes. Map the primary path from the monitor arm to the nearest rear leg.
- Step 4: Bundle & Sleeve the Leg Conduit (Minutes 50–70): Gather monitor power, video signals, and hub connections into a zippered neoprene sleeve. Secure the sleeve flush against the rear face of the desk leg.
- Step 5: Decouple the Surge Protector (Minutes 70–80): Mount your surge protector to the wall baseboard or place it inside a Scandinavian floor cable box directly behind the sleeved leg. Plug in all transformer bricks.
- Step 6: Sit Down & Sightline Verification (Minutes 80–90): Sit in your chair, adjust lighting, and view the desk from room entry angles. Tightly clip any micro-droops so zero cables breach the clear visual plane.
Essential Hardware Checklist for Glass Desk Wire Management
Before beginning your cable concealing project, ensure you have these damage-free, glass-safe organization accessories on hand:
- Neodymium Magnetic Cable Clips: Magnetic silicone wire organizer clips snap directly to steel framing without adhesives.
- Zippered Neoprene Sleeves: 4-pack 19.5-inch flexible neoprene cable sleeves provide soft, non-abrasive encapsulation.
- Weighted Cable Spine: Under-desk articulating vertebrae cable conduit with heavy floor plate for standing desk setups.
- Monitor Arm Reinforcement Plate: Steel monitor mount reinforcement bracket to distribute C-clamp stress evenly across tempered glass.
- Self-Gripping Micro-Velcro Ties: 50-pack reusable velcro wire ties for adjustable, residue-free cable grouping.
- Scandinavian Floor Cable Box: Matte wooden-lid cable storage box to hide bulky transformer bricks and surge protectors.
Frequently Asked Questions About Glass Desk Cable Management
Can you use adhesive cable clips directly on tempered glass?
While adhesive clips adhere firmly to tempered glass, it is strongly discouraged. The white or gray adhesive pad is 100% visible from above through the clear desktop, destroying the aesthetic minimalism of your workspace. Furthermore, UV exposure and warmth dry out adhesives, leaving gummy residues that require razor scraping or harsh solvents that risk scratching the glass.
Will clamping a cable tray shatter a glass desk?
Yes, standard screw-clamp cable trays can shatter a glass desk if installed incorrectly. Tempered glass is vulnerable to point-load pressure on its perimeter edges. If you must use a clamp-on cable tray, always place rubber or silicone buffer pads between the metal clamp and the glass, or choose a model that clamps exclusively to the steel support frame rather than the glass pane.
What color cable sleeves look best with a glass desk?
Always match your cable sleeve color to your desk frame rather than the glass. If your desk has a matte black steel frame, use matte black zippered neoprene sleeves. If the frame is brushed aluminum, chrome, or white, use white woven PET or light gray sleeves. The goal is to make the sleeve optically merge into the structural silhouette of the desk legs.
How do you manage monitor cables on a glass desk?
Route monitor cables directly down the internal channels of your monitor arm or zip-tie them tightly along the rear spine of the pole mount. When the cables exit the base of the mount, immediately turn them 90 degrees along the rear structural frame rail rather than letting them dangle freely behind the glass.
Can you drill cable management holes into a tempered glass desk?
No. You must never attempt to drill holes into a tempered glass desk. Tempered glass is engineered with balanced internal tensile and compressive stresses created during thermal processing. Any attempt to cut, drill, or carve the glass will disrupt this equilibrium, causing the entire desktop to violently shatter into thousands of small pebble fragments.
Elevate Your Aesthetic Workspace
Take your desk setup from clean to breathtaking with our curated workspace optimization and styling guides:
- Master broader organization with 20 Cable Management Hacks for Clean Setups.
- Safely mount your display using our Glass Desk Monitor Arm Safety Guide.
- Compare display mount flexibility in our Monitor Arm Pros and Cons Analysis.
- Create a warm, peaceful atmosphere with our Cozy Desk Setup Ideas.
- Compare ergonomic surface textures in our Cork vs Leather Desk Mat Showdown.
Pingback: How to Mount a Power Strip Under a Desk Without Drilling (5 Hacks)
Pingback: How to Hide Cables on a White Desk: 5 Zero-Visibility Hacks