
Affiliate Disclosure: My Aesthetic Desk is reader-supported. When you purchase through links on our site, we may earn an affiliate commission at no extra cost to you. As an Amazon Associate, I earn from qualifying purchases. Learn more in our Affiliate Disclosure.
Nothing ruins a sleek, minimalist workspace faster than a tangled rat’s nest of surge protectors, bulky AC adapters, and black power cords pooling across your floor. Beyond creating a visual eyesore on Instagram and Pinterest desk setups, a power strip resting on the carpet is a notorious dust trap, a vacuuming obstacle, and a constant target for accidental toe kicks that sever power to your PC mid-render.
The obvious ergonomic solution is to suspend your surge protector directly beneath your desktop. However, many desk owners hit an immediate roadblock: the fear of drilling. Whether you invested $800+ into a solid walnut standing desk, lease a corporate rental desk, or own an IKEA butcher block (like the popular Karlby or hollow-core Linnmon/Lagkapten) where driving wood screws risks cracking the delicate veneer or stripping fragile honeycomb paper, power tools feel excessively risky.
Fortunately, modern workspace engineering has made drill bits completely obsolete for under-desk cable organization. In this comprehensive guide, we test and rank the 5 best methods to mount a power strip under a desk without drilling. We analyze load capacities, adhesive shear strengths, thermal safety clearances, and surface damage risks so you can achieve a zero-cable floor setup in under 15 minutes.
AEO Quick Answer: How to Mount a Power Strip Under a Desk Without Drilling
To mount a power strip under a desk without drilling, use either padded clamp-on mounting brackets (which grip the desktop edge via hand-tightened C-clamps with zero residue) or industrial 3M Dual Lock reclosable fasteners (which hold up to 10 lbs via interlocking polyolefin mushroom stems). For large setups with bulky transformer bricks, install a clamp-on under-desk cable management channel tray to support multiple power strips and heavy chargers without modifying the desktop.
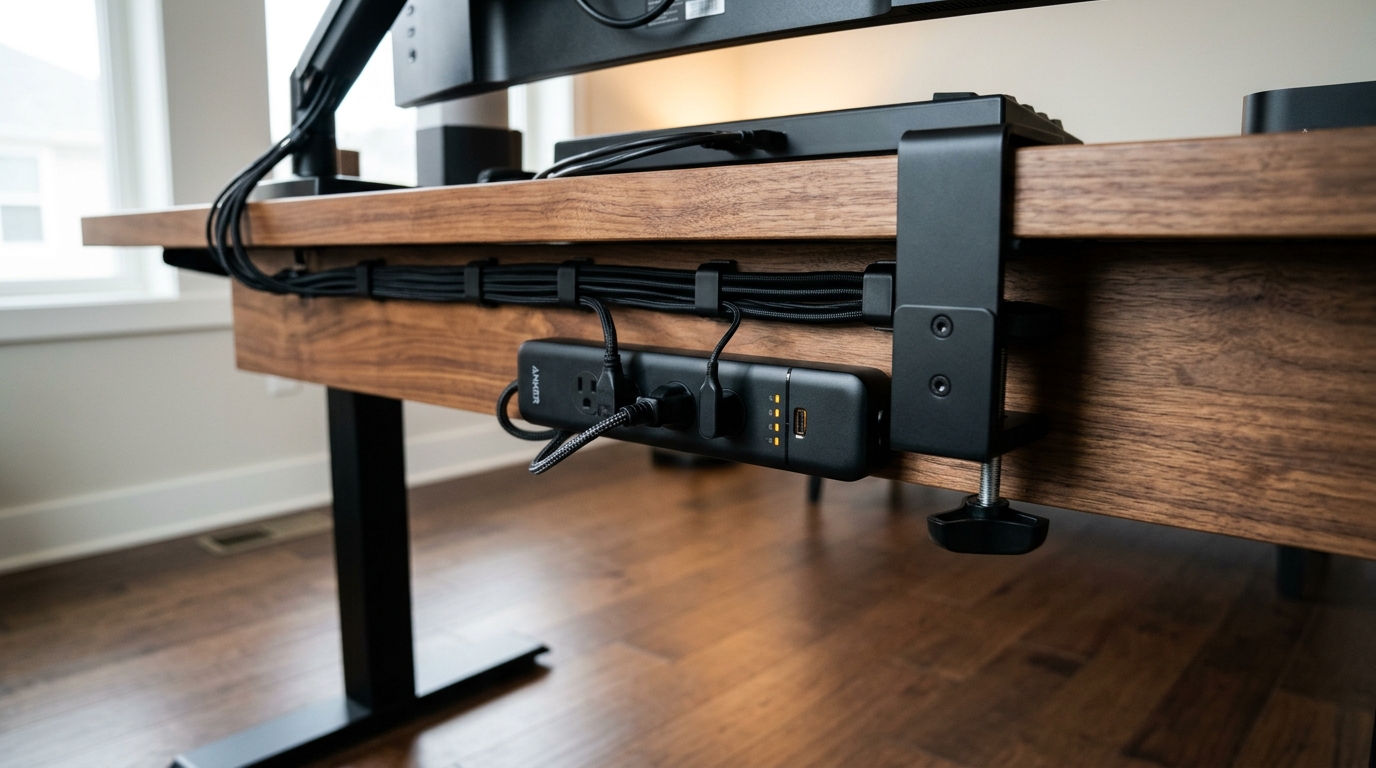
Comparison Matrix: 5 Drill-Free Power Strip Mounting Methods Tested
Here is an at-a-glance technical breakdown comparing our 5 drill-free mounting hacks across weight limits, desktop surface compatibility, damage risk, and long-term reusability:
| Mounting Method | Weight Capacity | Desktop Compatibility | Residue / Damage Risk | Reusability | Best For |
|---|---|---|---|---|---|
| 1. Padded Clamp Mount | 15–25 lbs (High) | All solid, composite, & glass desks (0.4″–2.4″ thick) | Zero risk (soft silicone padding) | 100% Reusable instantly | Heavy plugs, frequent unplugging, rented desks |
| 2. 3M Dual Lock Fasteners | 8–12 lbs (Medium-High) | Smooth wood, laminate, steel, & plastic surfaces | Low (peels clean with alcohol) | Reusable hook engagement | Completely hidden, flush undermounting |
| 3. Clamp-On Channel Tray | 20–35 lbs (Maximum) | Any desktop with 1.5″ rear lip clearance | Zero risk (foam-lined clamps) | 100% Reusable indefinitely | Large power bricks, dual power strips, bulky AC plugs |
| 4. Neodymium Rubber Magnets | 15–30 lbs (High) | Desks with steel frames or crossbeams | Zero risk (protective rubber coating) | 100% Reusable instantly | Motorized standing desks & metal office desks |
| 5. Acrylic Gel Nano Tape | 3–6 lbs (Light) | Sealed hard surfaces only (Not raw MDF) | Medium (can peel delicate paper veneer) | Single or dual use | Ultralight 3-prong taps, slim USB hubs |
Hack #1: Padded Clamp-On Under-Desk Mounts (The Zero-Risk Benchmark)
Definition: A clamp-on power strip mount is an adjustable metal bracket engineered with rubber-padded C-clamps that securely anchors a surge protector to desk edges via hand-tightened thumbscrews without surface penetration.
If you want the ultimate combination of structural rigidity, zero surface residue, and infinite adjustability, a mechanical clamp mount is the indisputable winner. Unlike adhesives, which rely on chemical bonding that can weaken under thermal heat or gravitational shear stress, a clamp relies on pure mechanical tension.
When you plug in heavy three-prong grounded cords (such as high-wattage desktop PSU power cables or monitor cords), you exert significant insertion and withdrawal force. Adhesive tapes often shear off after repeated tugging. A clamp mount withstands vertical and horizontal pulling forces effortlessly without budging a millimeter.
How to Install a Clamp-On Power Strip Holder:
- Inspect Edge Clearance: Measure the thickness of your desktop. Most commercial clamp mounts accommodate desktops ranging from 0.4 inches (10 mm) up to 2.4 inches (60 mm). Ensure your desk frame or under-bevel allows at least 1.5 inches of clamp depth.
- Position for Ergonomics: Place the mount near the back corner of your desk or directly underneath your monitor arm mount. This keeps power cables hidden behind your monitor riser while keeping switch access within arm’s reach.
- Tighten by Hand: Hand-tighten the thumb screw until snug. The pre-installed EVA foam or rubber pads will compress against the desk finish, creating high friction without denting or scratching expensive timber.
- Lock In the Power Strip: Expand the spring-loaded or screw-tightened side jaws, insert your surge protector, and lock it into place.
Recommended Product: The Mount-It! Clamp-On Desk Power Strip Holder features heavy-duty steel construction, integrated cable management slots, and soft silicone cushions that protect delicate veneer while supporting up to 20 lbs of plugging force.
Hack #2: Industrial 3M Dual Lock Fasteners (The Invisible Flush Mount)
Definition: 3M Dual Lock is a heavy-duty reclosable fastening system featuring interlocking mushroom-shaped polyolefin heads that snap together with an audible click, delivering five times the tensile strength of traditional hook-and-loop velcro.
Many desk enthusiasts prefer their power strip to be 100% invisible—tucked completely flat against the underside of the desk rather than clamping onto the visible perimeter edges. Standard household velcro fails miserably in this orientation: gravitational pull combined with the ambient heat generated by charging bricks causes the soft fabric loops to stretch, sag, and eventually detach at 2:00 AM.
3M Dual Lock (specifically SJ3550 or SJ3560) completely solves this issue. Because both sides feature rigid mushroom-stem heads rather than fuzzy fabric loops, the connection does not stretch under continuous deadweight. It provides a rock-solid, rigid lock that can easily support power strips weighing 8 to 12 lbs, yet still allows you to detach the power strip whenever you need to reconfigure your setup.
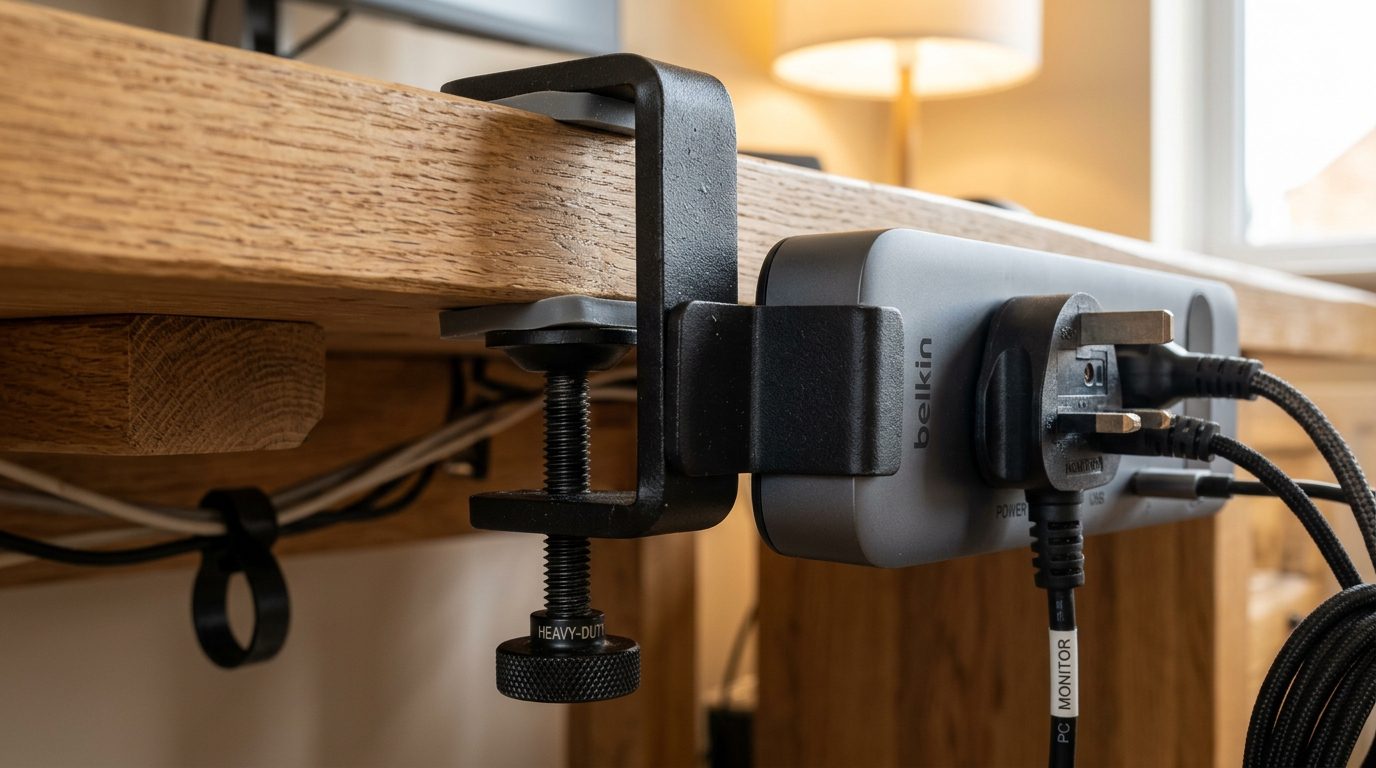
The 4-Step 3M Dual Lock Installation Blueprint:
- Step 1: Degrease the Bonding Surfaces: Factory finishes, skin oils, and sawdust will ruin adhesive contact. Wipe both the back of your power strip and the target area under your desk with 70% Isopropyl Alcohol (IPA) using a lint-free microfiber cloth. Allow it to air dry for 60 seconds.
- Step 2: Mate the Strips First: Cut two 4-inch strips of 3M Dual Lock. Snap the two opposing strips together before peeling off the adhesive liner until you hear and feel the distinctive audible snap.
- Step 3: Apply Firm Pressure: Peel the backing from one side and press the strip firmly along the spine of the power strip. Then peel the second backing and press the power strip against the desk underside, holding maximum pressure for 30 seconds across the entire length.
- Step 4: The Crucial 24-Hour Cure: While the mechanical stems lock immediately, the pressure-sensitive acrylic adhesive requires 24 hours to reach 90%+ bonding strength. Do not plug heavy cables or transformers in immediately; support the strip or let it cure unloaded overnight.
Recommended Product: 3M Dual Lock Reclosable Fastener SJ3560 with high-bond clear acrylic adhesive withstands temperatures up to 200°F (93°C), preventing adhesive softening from hot charging bricks.
Hack #3: Clamp-On Cable Channel Trays (For Massive Chargers & Bricks)
Definition: An under-desk clamp cable tray is an open steel mesh or powder-coated metal trough suspended beneath the desk rear via upright edge clamps, designed to support multiple power strips and oversized power transformers simultaneously.
If your workspace features multiple monitors, a gaming PC, external audio interfaces, and high-wattage USB-C GaN charging stations, securing just a single power strip under the desk only solves half your cable clutter. You still have to contend with massive 96W–140W MacBook charging bricks, monitor power bricks, and coiled excess cord length.
A clamp-on under-desk cable management tray provides a spacious 16-to-30-inch horizontal cradle. You simply lay your existing surge protector directly inside the tray alongside all heavy power adapters. Open-wire mesh designs promote natural air circulation, preventing heat buildup around dense power supplies. However, if you are outfitting a transparent surface where C-clamps risk cracking the perimeter, check our safe frame-anchored walkthrough on how to hide cables on a glass desk.
Why Channel Trays Are the Cleanest Setup for Standing Desks:
For motorized sit-stand desks, cable trays are unbeatable. By placing your master surge protector inside an under-desk channel tray, every monitor cable, desktop accessory cord, and lamp plug connects directly under the desk surface. As detailed in our guide to standing desk cable management spines, this consolidation means only one single master power cord ever needs to travel between your moving desktop and the wall outlet.
Recommended Product: The Stand Steady Clamp-On Under Desk Cable Management Tray requires zero tools, fits desks up to 2 inches thick, and supports up to 35 lbs of gear with zero sagging.
Hack #4: Heavy-Duty Neodymium Rubber-Coated Magnets (For Steel Frames)
Definition: Neodymium mounting magnets utilize rare-earth magnetic discs encased in thermoplastic vulcanizate (TPV) rubber housings that attach directly to ferrous steel standing desk frames without drilling, adhesives, or edge clamps.
Almost every modern height-adjustable standing desk (including models from Uplift, Fully Jarvis, FlexiSpot, and Secretlab) is constructed with heavy-gauge steel under-desk support rails, central crossbeams, and steel leg columns. If you have steel framing beneath your desktop, magnetic mounting is one of the cleanest, fastest, and most modular tricks in modern desk setup design.
Never use bare metal magnets directly against powder-coated desk frames, as metal-on-metal friction will scrape paint and slide under cord weight. Instead, use rubber-coated rare-earth neodymium mounting bases rated for 20 to 50 lbs of vertical magnetic pull force. The rubber skin delivers exceptional anti-slip shear friction, preventing the mount from sliding down vertical steel beams when cables are yanked.
How to Build a Magnetic Power Strip Mount:
- Purchase two rubber-coated neodymium magnet pots equipped with threaded male studs or countersunk screw holes.
- Many metal-housing surge protectors (such as heavy-duty workshop or rackmount strips) already feature rear mounting keyholes. Attach matching machine screws into the magnet pots and slide them into the power strip keyholes.
- Alternatively, attach the magnetic bases to a lightweight acrylic bracket or zip-tie the power strip securely to the magnetic mounts.
- Snap the magnetic assembly directly onto your desk’s central steel crossbar. You can slide and reposition it effortlessly whenever you alter your peripheral configuration.
Hack #5: Heavy-Duty Acrylic Gel Nano Tape (Best for Lightweight Power Taps)
Definition: Heavy-duty acrylic nano tape is a clear viscoelastic synthetic polymer tape with high cohesive strength that forms an immediate vacuum-assisted suction grip on smooth non-porous surfaces.
For lightweight 3-outlet power taps, smart plug adapters, or slim USB charging hubs, heavy clamp brackets or channel trays may be overkill. Heavy-duty acrylic gel tape (often marketed as Alien Tape or Traceless Nano Tape) provides an invisible, ultra-thin mount that sits entirely flush against the desk underside.
Critical Warnings for IKEA Desks (Karlby vs. Linnmon/Lagkapten):
Warning for Paper Foil Veneers: High-bond acrylic gel tapes bond with extraordinary tenacity. On solid hardwood or polyurethane-sealed tops, the tape peels away cleanly when stretched. However, on hollow-core paper-veneered MDF desks (like the IKEA Linnmon or basic particle board), the adhesive bond is frequently stronger than the desk’s paper skin. Removing the tape forcefully will tear the finish. For hollow-core desks, always choose Hack #1 (Clamp Mounts) or Hack #3 (Cable Trays) instead.
Thermal Safety & Electrical Precautions (What Most Guides Ignore)
Mounting electrical hardware out of sight under a desk introduces subtle thermal and safety considerations that every desk builder must follow:
- Maintain Thermal Convection Clearance: Modern USB-C fast-chargers (GaN adapters delivering 65W to 140W) generate noticeable heat under load. Never wrap your power strip in foam, fabric, or tight cardboard enclosures. Maintain at least 1.5 to 2 inches of free vertical air space around power transformers to prevent thermal throttling or component degradation.
- Select Adequate Surge Joules: A simple extension cord tap offers zero protection against electrical spikes. Choose a dedicated surge protector offering at least 1,000 to 2,500 Joules of MOV (Metal Oxide Varistor) protection, along with a built-in 15A resettable circuit breaker.
- Install Strain Relief Anchors: The thick main power cord dropping from your power strip down to the baseboard outlet exerts continuous gravitational lever arm pressure on your mount. Place an adhesive cable clip or clamp 4 inches from the power strip’s cord exit to absorb this mechanical strain, ensuring zero peeling torque on your mounting system.
- Ensure Switch Accessibility: Position the power strip so that the master On/Off switch can be reached blindly with one hand without requiring you to crawl under your desk in an emergency.
5-Minute Step-by-Step Installation Blueprint
Follow this chronological workflow to guarantee a clean, permanent, and rock-solid installation on the first try:
- Map Your Cable Geometry: Before mounting anything, place your monitor, PC, desk lamp, and audio monitors in their final positions. Plug each cord into the power strip to verify that every cable reaches without excessive tension.
- Account for Wall Warts: Heavy AC adapter bricks consume more physical space than standard 3-prong plugs. Space your devices across wide-spaced transformer outlets first to prevent blocking neighboring ports.
- Clean the Underside Thoroughly: Use Isopropyl Alcohol to dissolve dust, oils, and chemical release agents. Wait 60 seconds until bone dry.
- Anchor the Mounting Mechanism: Install your chosen mount (hand-tighten clamps or apply 30-second continuous pressure to 3M Dual Lock). If using adhesives, allow a 24-hour cure before loading.
- Dress Cords with Reusable Velcro Ties: Bundle excess cord slack into tight, tidy loops using hook-and-loop cable ties. For clean routing along desk legs, see our comprehensive guide to cable management hacks and how to hide cables on a white desk.
Frequently Asked Questions: Under-Desk Power Strip Mounting
Can 3M tape really hold a heavy surge protector upside down?
Standard double-sided foam tape or generic mounting tape will fail over time under continuous gravity and transformer heat. However, 3M Dual Lock (SJ3550/SJ3560) utilizes high-performance acrylic adhesive rated for elevated temperatures and interlocking mushroom polyolefin stems. When applied to a degreased surface and allowed to cure for 24 hours, it effortlessly supports heavy surge protectors weighing up to 10 lbs upside down.
How do I mount a power strip under an IKEA Karlby or Linnmon desk without damage?
For an IKEA Karlby (solid particle board with real wood veneer), padded clamp-on mounts or 3M Dual Lock work exceptionally well because the wood veneer is durable. For hollow-core paper honeycomb desks like the IKEA Linnmon or Lagkapten, never use high-tack adhesive tape because removal will tear the paper finish. Instead, use a clamp-on under-desk cable management tray positioned over the reinforced solid perimeter edge.
Is it safe to mount a surge protector upside down under a desk?
Yes, quality surge protectors function identically in any orientation. Mounting upside down actually offers a distinct safety benefit: it prevents conductive debris, dust, and beverage spills from settling inside open electrical sockets. Just ensure open air circulation around high-wattage power supplies.
How do I remove heavy-duty mounting tape without peeling the desk veneer?
Never pry or rip adhesive tape directly away from wood veneer. Instead, take a length of dental floss or high-test nylon fishing line, slide it behind the power strip, and use a gentle back-and-forth sawing motion to slice through the adhesive foam core. Once the power strip is removed, gently roll the remaining adhesive off with your thumb or apply a citrus-based solvent (such as Goo Gone) to dissolve the glue residue safely.
Should I mount my power strip to the desk underside or the wall behind the desk?
For standing desks (and anyone seeking an aesthetic wire-free floor), mounting to the desk underside is significantly superior. When mounted to the desk, all your monitor cables, desktop chargers, and peripheral wires travel synchronously with the desk when adjusting heights. If mounted to the wall, every single cable must have individual slack, creating an unsightly hanging bundle behind your setup.
Complete Your Clean Workspace Setup
An invisible under-desk power hub is the bedrock of an aesthetic workstation. Pair your drill-free cable setup with our top-rated workspace optimization guides:
- Explore our 15 essential Cable Management Hacks for Modern Desks.
- Clean up vertical travel with our breakdown of the Standing Desk Cable Management Spine.
- Clear desktop clutter with a drill-free Under-Desk Headphone Hanger and Under-Desk Storage Drawer.
- Elevate your desk warmth with handcrafted Walnut Desk Accessories.
Pingback: 7 Aesthetic Cable Management Hacks: No-Drill Desk Solutions
Pingback: Monitor Arm Pros and Cons: Is an Ergonomic Arm Worth It? (2026)